Optimization & Reporting
Reporting
Statistics Overview
Summary
This page explains how to analyze campaign performance using DAO.AD statistics, reports, charts, and filters.
Before You Begin
- Role: Advertiser
- Estimated time: 2 minutes
Steps
- Open the Statistics section from the top navigation menu and select the desired ad format.

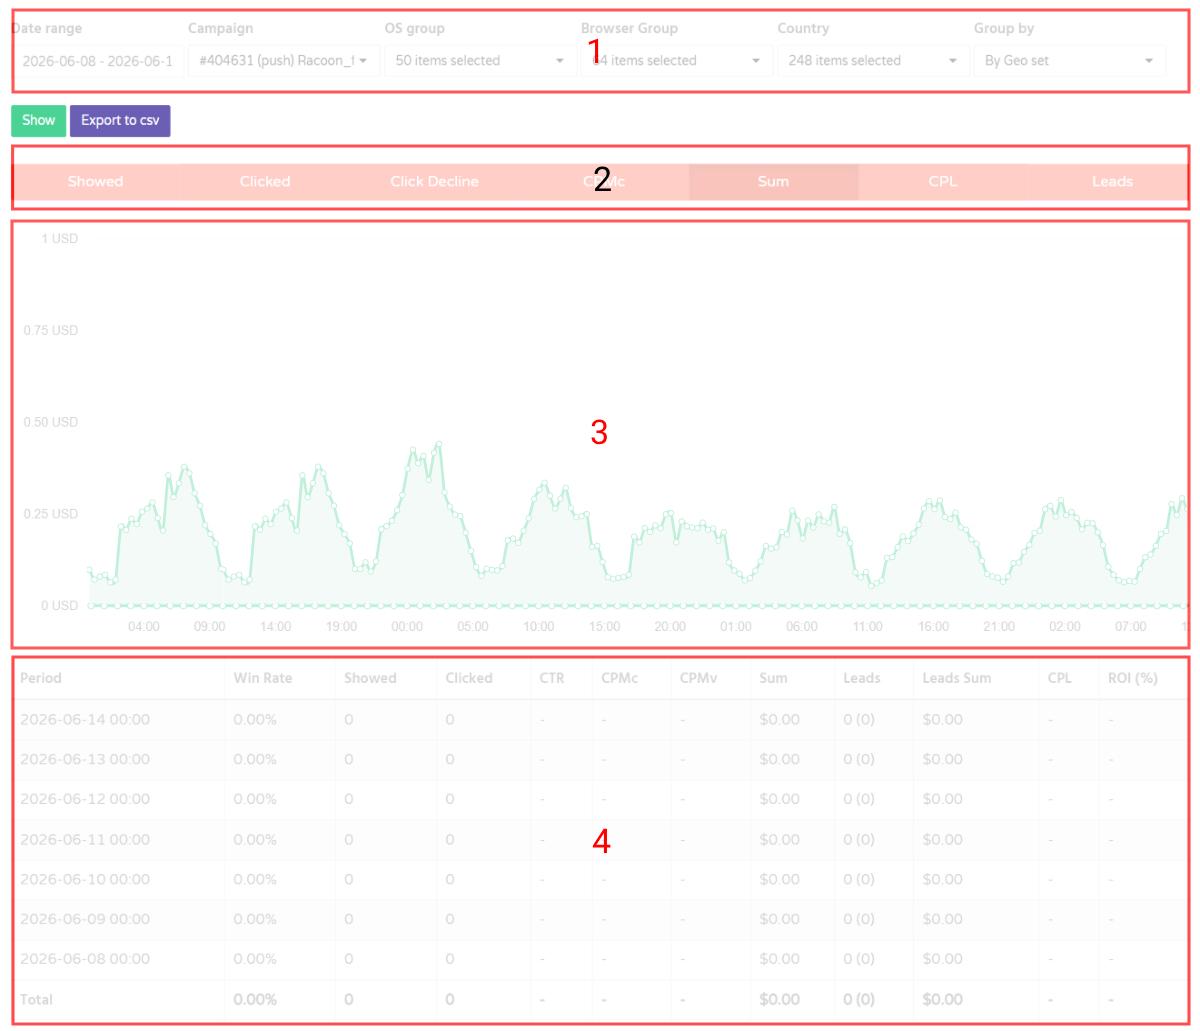
- The Statistics page is divided into four main sections:
Filters (1), KPI metrics (2), Performance Charts (3), and the Data Table (4).
- Use the filters to select a date range and refine your report by campaign, operating system, browser, country, or other available dimensions.
- Use the Group By option to view performance data by day, hour, GEO set, browser, and other categories.
Related
Statistics KPI
Summary
This page provides an overview of statistics filters, grouping options, and KPI metrics available in DAO.AD.
Before You Begin
- Role: Advertiser
- Estimated time: 2 minutes
Steps
- Open the Statistics section from the top navigation menu and select the desired ad format.
- The following filters are available:
a. Date range - Filter statistics by a selected date range. The maximum available reporting period is 60 days.
b. Campaign - Filter statistics for a specific campaign.
c. OS group - Analyze performance by operating system.
d. Browser Group - View statistics grouped by browser type.
e. Country - View performance data by country.
f. Group by - Available grouping options:
- by hours - Displays statistics grouped by hour within the selected date range.
- by days - Displays statistics grouped by day.
- by month - Displays statistics grouped by month.
- by countries - Aggregates statistics by country.
- by geo set - Aggregates statistics by GEO set.
- by creative - Aggregates statistics by creative.
- by campaign - Aggregates statistics by campaign.
- by browsers - Aggregates statistics by browser.
- by browser family - Aggregates statistics by browser family.
3. The report table contains the following KPI Definitions:
- Period - dates and hours
- Win Rate – percentage of auction wins compared to total bidding opportunities.
- Showed - Total number of ad impressions served.
- Clicked - Total number of clicks received.
- CTR – percentage of impressions that resulted in a click.
- CPMc - Average cost per 1,000 clicks.
- CPMv - Average cost per 1,000 impressions.
- Sum - Total advertising spend for the selected reporting group.
- Lead - Total number of conversions. Postback tracking must be configured.
- Leads sum - Total revenue generated from recorded conversions.
- CPL - Average cost per lead.
- ROI (Return on Investment) – profitability percentage based on advertising spend and conversion revenue.
Related
- Statistics Overview
- Export Reports to CSV
- Micro-bidding Tool
- Automatic Rules for Blacklisting
- Statistics Overview
Export Reports to CSV
Summary
Learn how to export campaign statistics from DAO.AD into a CSV file for reporting and optimization purposes.
Exported CSV files can be used for offline reporting, campaign analysis, custom dashboards, and data processing in tools such as Microsoft Excel, Google Sheets, or BI platforms.
Before You Begin
- Role: Advertiser
- Estimated time: 2 minutes
Steps
- Open the Statistics section from the top navigation menu and select the desired ad format.
- Apply the desired filters, date range, and grouping options.
- Click the Export to CSV button located next to the filter section.

- Select the preferred export options. Select Separator and Encoding and click Export to csv

Related
Optimization
Blacklist and Whitelist Targeting
Summary
Use blacklists and whitelists to block or allow traffic from specific sources and IP ranges.
Before You Begin
- Role: Advertiser
- Required information:
- source IDs
- IP addresses or CIDR ranges
- Estimated time: 2-4 minutes
Steps
Option 1: Blacklisting of sources
- On the campaign creation page, locate the Black\White list section and the Blacklist of sources
- Enter the Source IDs to block, separated by commas.

Option 2: Whitelisting of sources
- On the campaign creation page, locate the Black\White list section and the Whitelist of sources
- Enter the Source IDs to allow, separated by commas.

Information: Use the {source_id} parameter in your tracking URL or postback to identify traffic sources.
Option 3: IP and CIDR Whitelisting/Blacklisting
- On the campaign creation page, locate the Black\White list section and the Whitelist of CIDR/IP
- Enter IP addresses or CIDR ranges in the appropriate whitelist or blacklist field. Both IPv4 and IPv6 CIDR ranges are supported.
Troubleshooting
Issue: I'm still receiving traffic from a blacklisted source
Solution:
- blacklist changes are not always applied instantly. Users who already received a notification may still generate clicks.
Verification
Related
- Targeting by vertical
- Traffic volume and bid recommendations
- Targeting by operating system
- Automatic Rules for Blacklisting
Micro-bidding Tool
Summary
Use the Micro-bidding Tool to assign different bids to specific Source IDs or Sub IDs.
Before You Begin
- Role: Advertiser
- Required information:
- source IDs and/or Sub IDs
- Estimated time: 2-4 minutes
Steps
- Locate the Black/Whitelist section and the Micro-bidding Rules field.
- Click Add bid rule to create a new bidding rule.

- Enter the Source IDs or Sub IDs and set a custom bid for them.

Information: Micro-bidding rules override the default campaign bid for the specified Source IDs or Sub IDs.
- Repeat the process to create additional bidding rules if needed.
Troubleshooting
Issue: I don't know the Source IDs or Sub IDs
Solution:
- use the
{source_id}and{sub_id}parameters in your tracking URL or postback to identify traffic sources and sub-sources.
Verification
Related
- Blacklist and Whitelist Targeting
- Traffic volume and bid recommendations
- Automatic Rules for Blacklisting
Automatic Rules for Blacklisting
Summary
Automatic Rules for Blacklisting allow you to automatically block unprofitable traffic sources based on custom conditions.
Before You Begin
- Role: Advertiser
- Estimated time: ~5 minutes
Steps
- Locate the Black/Whitelist section and the Automatic rules for BL area.
- Click Add rule to create a new blacklisting rule.

- Configure rule conditions to automatically blacklist unprofitable sources.
Each rule uses IF-THEN logic. If both configured conditions are met, the traffic source is automatically added to the campaign blacklist.
The first part of condition, it's one of these parameters:- Spent
- Show
- Click

- The second condition can use one of the following metrics:
- Number of clicks
- Number of leads (main)
- Number of leads (all)
- Sum of leads
- ROI
- Cost per lead (CPL main)
- Cost per lear (CPL all)

- Repeat the process to create additional autoblacklisting rules if needed.

Troubleshooting
Issue: Sources are not being added to the blacklist automatically
Solution:
- Verify that your campaign has a correctly configured postback.
- Make sure conversion data is being received in campaign statistics.
- Check that the automatic rule conditions have been met.
- Confirm that the campaign is active.
Issue: ROI, CPL, or lead-based rules are not working.
Solution:
- Verify that conversion postbacks are being received.
- Make sure lead values are passed correctly in the postback.
- Wait until enough clicks and conversions have been collected to meet the rule conditions.
Verification
Related
Bid Adjustments
Summary
This guide explains how to optimize campaign performance by adjusting bids based on traffic quality, conversion rates, and profitability.
Before You Begin
- Role: Advertiser
- Required information:
- Active campaign with traffic data
- At least 500–1000 impressions or several conversions
- Estimated time: 5 minutes
What is bid adjustment?
Bid adjustment is the process of increasing or decreasing your bid to maximize ROI and campaign performance.
Increasing bids may help you:
- Win more auctions
- Receive more traffic
- Scale profitable placements
Decreasing bids may help you:
- Reduce spending
- Improve ROI
- Eliminate unprofitable traffic
When should you adjust bids?
Recommended situations:
Increase bid when:
- ROI is positive
- Conversions are consistent
- Traffic volume is limited
- High-performing zones lose auctions
Decrease bid when:
- ROI is negative
- CPC is too high
- Traffic does not convert
- Cost exceeds revenue
Bid adjustment strategy
Conservative Optimization
| ROI > 30% | Increase bid by 5-10% |
| ROI 0 - 30% | Keep current bid |
| ROI < 0% | Decrease bid by 5-10% |
Aggressive Scaling
| ROI > 50% | Increase bid by 15 - 25% |
| ROI 10 - 50% | Increase bid by 5 - 10% |
| ROI < 0% | Decrease bid by 10 - 20% |
Optimization by Traffic Source
Zone / Placement Optimization
Increase bids for:
- Top converting zones
- High CTR placements
- Consistent profitable sources
Decrease bids for:
- High spend, no conversions
- Low-quality placements
- Sources with poor ROI
GEO Optimization
| GEO | ROI | Action |
|---|---|---|
| US | 45% | Increase bid |
| DE | 28% | Keep |
| BR | -15% | Decrease bid |
Device Optimization
| Device | ROI | Action |
|---|---|---|
| Android | 38% | Increase bid |
| iOS | 12% | Keep |
| Desktop | -22% | Decrease bid |
Best Practices
- Avoid large bid changes.
- Adjust bids gradually.
- Wait for sufficient data before making decisions.
- Review campaign performance daily.
- Combine bid adjustments with blacklists and whitelists.
Common Mistakes
❌ Increasing bids without enough data
❌ Optimizing after only a few clicks
❌ Ignoring ROI and focusing only on CTR
❌ Making multiple bid changes within a short period
❌ Scaling unprofitable traffic