Tracking & Postback
This book covers tracking setup, postback integration, conversion attribution, and troubleshooting on the DAO.AD platform.
- Concepts
- How tracking works
- Tracking Configuration Models
- Tracking Parameters
- Postback Parameters
- Tracking section
- Trackers and Examples
Concepts
How tracking works
Summary
This guide explains how click tracking and postback tracking work in DAO.AD. You will learn how to track conversions, pass click identifiers, and configure postbacks with or without a third-party tracking platform.
What is Tracking?
Tracking allows advertisers to identify which clicks, sources, campaigns, and creatives generate conversions.
Without tracking, DAO.AD can only report clicks and impressions. With tracking configured, advertisers can measure leads, sales, ROI, and optimize traffic sources.
What is a Postback?
A postback is a server-to-server notification sent after a conversion occurs.
When a user completes a target action (registration, purchase, lead, install, etc.), the advertiser's system or affiliate network sends a conversion notification containing the original click identifier.
This allows DAO.AD to match the conversion with the original click.
How click tracking works
Step 1
User clicks a DAO.AD advertisement.
Step 2
DAO.AD generates a unique click identifier: {click_id}
Step 3
DAO.AD sends the user to the destination URL while passing the click identifier.
Example:https://tracker.com/?clickid={click_id}
Step 4
The click identifier is stored by the tracking system or CPA network.
Step 5
When the conversion happens, the stored click identifier is sent back through a postback URL.
Why postbacks are important
Postbacks allow DAO.AD to:
- track conversions and sales;
- calculate ROI and CPL metrics;
- optimize traffic sources;
- support automatic blacklisting rules;
- support micro-bidding by source or sub-source;
- provide accurate campaign statistics.
Without a postback, DAO.AD can track clicks and impressions only.
Related
- Tracking Configuration Models
- Tracking Parameters
- Postback Parameters
- Blacklist and Whitelist Targeting
- Micro-bidding Tool
Tracking Configuration Models
Summary
Tracking Configuration Models describes three common tracking setup models and how data flows between DAO.AD, tracking systems, and conversion sources.
Standard tracking configuration
Model 1: Direct CPA Integration

Steps:
- User clicks to the DAO.AD advertisement (your creative).
- DAO.AD generates a unique click ID and sends the user to the CPA network.
- The CPA network stores DAO.AD's click ID and redirects the user to the landing page.
- The user completes the target action (conversion), and the CPA network receives the conversion status from the landing page.
- The CPA network sends a postback to DAO.AD containing the click ID and conversion data.
Recommended for: advertisers using direct CPA network integrations.
Model 2: Tracker Integration

Steps:
- User clicks to the DAO.AD advertisement (your creative).
- DAO.AD generates a unique click ID and sends the user to the tracking system (e.g., Binom or Keitaro).
- The tracking system passes DAO.AD's click ID to the CPA network using its own parameter name. The parameter name may differ, but the value always contains DAO.AD's original click ID.
- The CPA network stores the tracking system click ID and redirects the user to the landing page.
- The user completes the target action (conversion), and the CPA network reports the conversion to the tracking system.
- The tracking system sends a postback to DAO.AD with the click ID and conversion data.
Recommended for: media buyers who need advanced analytics and optimization.
Model 3: Own Landing Page

Steps:
- User clicks to the DAO.AD advertisement (your creative).
- DAO.AD generates a unique click ID and sends the user directly to the advertiser's landing page.
- The user completes the target action (conversion), and the advertiser's system sends a postback directly to DAO.AD.
Recommended for: advertisers with their own landing pages and tracking infrastructure.
Related
- Tracking Parameters
- Postback Parameters
- Blacklist and Whitelist Targeting
- Micro-bidding Tool
- Test a Conversion (HTTP Examples)
Tracking Parameters
Summary
This page lists all URL macros available in DAO.AD and explains how to pass campaign data to CPA networks and tracking platforms.
| Macro | Value | Description |
|---|---|---|
{click_id} |
numeric | Unique Click ID |
{campaign_id} |
numeric | Campaign ID |
{creative_id} |
numeric | Creative ID |
{source_id} |
numeric | Publisher Source ID |
{sub_id} |
text | Publisher Sub-Source ID |
{price} |
numeric | Campaign bid price (per 1000 clicks) |
{country} |
text, ISO code | User country (ISO code) |
{subs_age} |
constant, text | The age of subscription in days: 1-3, 4-7, 8-15, 16+ |
{model_price} |
constant, text | Campaign pricing model (CPC or CPM) |
{cpc} |
numeric | Actual cost per click (CPC) |
{quality} |
constant, text | Traffic quality: low, regular, high, premium |
{category} |
constant, text | Campaign category: adult, racy, or mainstream |
{category_src} |
constant, text | Traffic source category: adult, racy, or mainstream |
{city} |
text | User city |
{region} |
text | User region |
{ref} |
text | Referring page full URL |
{ip} |
IP | User IP address |
{os} |
text | User operating system |
{browser} |
text | User browser |
These macros can be added to your destination URL and passed to a CPA network or tracking platform for reporting and optimization purposes.
Example URL
https://tracker.com/click?
clickid={click_id}
&source={source_id}
&campaign={campaign_id}
&country={country}
where:
tracker.com - example CPA network or tracking platform URL
clickid, source, campaign, country, etc. - are example parameters used by a CPA network or tracking platform. DAO.AD replaces the macros with actual values before redirecting the user. Parameter names may differ depending on the CPA network or tracker.
How macro replacement works
DAO.AD URL:
https://tracker.com/click?clickid={click_id}&country={country}
After click:
https://tracker.com/click?clickid=123456789&country=US
Related
- Postback Parameters
- Tracking Configuration Models
- Blacklist and Whitelist Targeting
- Micro-bidding Tool
Postback Parameters
Summary
This page describes the parameters available for sending postback requests from a CPA network or tracking platform to DAO.AD.
| URL Parameter | Value | Description |
|---|---|---|
| DAO.AD API Server | constant | DAO.AD postback endpoint URL |
| key | text | Unique API key used to authenticate server-to-server (S2S) postback requests. |
| sum | numeric | Conversion value or lead payout amount |
| click-id | numeric | Unique Click ID received from DAO.AD URL macros |
| type | text | The postback type (default is main). Common values include: main (e.g., registration), dep (e.g., deposit), or any custom types you define |
| ttl | numeric | Time in secounds. The postback request time-to-live (TTL). During this period, any postback containing the same Click ID will be treated as a duplicate and ignored. The default value is 24 hours. Minimum value 5 seconds |
Important: The API key can be found on your DAO.AD Profile page.
Example URL
http://api.daopush-api.info/api/postback/campaign?key=XXXXXXXXXXXXX&sum={sum}&click-id={click-Id}&type={type}&ttl={ttl}
where:
XXXXXXXXXXXXX - your DAO.AD API key
{sum}, {click-Id}, {type}, {ttl} - example macro names used by a CPA network or tracking platform.
How macro replacement works
DAO.AD URL:
http://api.daopush-api.info/api/postback/campaign?key=XXXXXXXXXXXXX&sum={sum}&click-id={click-Id}&type={type}&ttl={ttl}
After CPA/Tracker request:
http://api.daopush-api.info/api/postback/campaign?key=XXXXXXXXXXXXX&sum=10&click-id=61721111&type=dep&ttl=50
Important: These macro names are examples only and may differ depending on the CPA network or tracking platform. Always refer to the documentation of your CPA network or tracker.
Why is it needed?
After a user completes a conversion, the CPA network or tracking platform sends conversion information back to DAO.AD. This data is used for reporting, optimization, automated rules, micro-bidding, and campaign analytics.
Benefits of postback tracking:
- Accurate conversion tracking
- ROI calculation
- Automated blacklisting rules
- Micro-bidding optimization
- Source and sub-source analysis
- Campaign performance reporting
Related
Tracking section
Summary
This page describes how to perform a test conversion and where to view your postback log.

Once you reach this section, you can perform a test conversion. To do this, you need to:
- Select the tracker you use from the list. If it's not listed, you can use a universal postback link. (It's important to understand which macro you're passing the click_id parameter to so you can return it correctly.)

- Create a campaign with the correct link based on your tracker settings. You will then be able to select the campaign from the list (the link is automatically pulled from the campaign).

- After clicking the "Start Test" button, a link will be generated that you can use to follow the entire user flow up to lead and await the return of the postback.

- After successfully completing the lead flow, you will be able to see your conversion in the list.

In addition, all errors will be logged in the corresponding list with a detailed description, enabling the problem to be identified as quickly as possible.
Trackers and Examples
This chapter contains examples of integrations with common known trackers with DAO.AD
Keitaro
Summary
This guide explains how to integrate Keitaro with DAO.AD for click tracking and conversion tracking.
Before You Begin
- Role: Advertiser.
- Required information:
- Access to a Keitaro tracker
- Estimated time: 5 minutes
Keitaro Tracking Flow

Steps
- Sign in to Keitaro tracker.
- Open the "Traffic Sources" menu.

- Click the "Create" button and select the "DAO.AD" template.

- Locate the "S2S Postback" section and click the Edit button.

- Configure the postback URL using the URL constructor.

- Replace the API key placeholder with your DAO.AD API key from DAO.AD Profile page and click Apply.
- Verify that all parameters are configured correctly.

- Save the created traffic source.
- Go to "Campaigns" menu in Keitaro tracker.
- Create a campaign connected to your CPA network or landing page.
- Select the previously created "DAO.AD" traffic source and save the campaign.

- Copy the campaign URL by clicking the Link icon.

- Paste the campaign URL into the Creative URL field in DAO.AD.

- Save the creative and campaign settings in DAO.AD.
How it works
- DAO.AD sends a click ID to Keitaro.
- Keitaro stores this click ID and passes the user to your offer.
- When a conversion happens, Keitaro sends a postback to DAO.AD with the original click ID and conversion value.
Related
- Tracking Parameters
- Postback Parameters
- Test a Conversion (HTTP Examples)
- Tracking Configuration Models
- Micro-bidding Tool
Voluum
Summary
This guide explains how to integrate Voluum with DAO.AD for click tracking and conversion tracking.
Before You Begin
- Role: Advertiser.
- Required information:
- Access to a Voluum account
- Estimated time: 5 minutes
Voluum Tracking Flow

Steps
- Sign in to Voluum tracker.
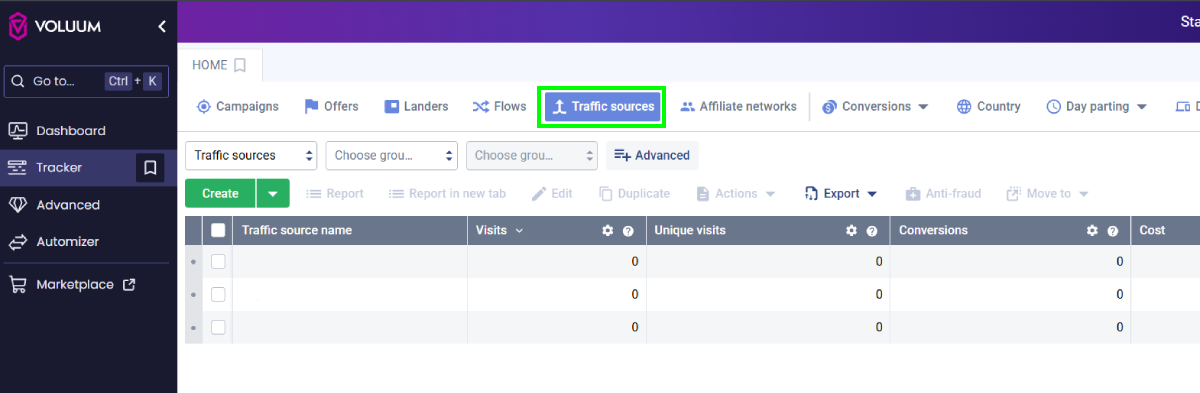
- Open the "Traffic sources" menu and click "Create".

- Locate the "DAO.AD" template.

- Scroll down to the "Passing conversion info to traffic source" section.
- Replace the API key placeholder with your DAO.AD API key from the DAO.AD Profile page and click Save.

- Go to "Campaigns" menu in Voluum tracker.
- Create a campaign connected to your CPA network or landing page.
- Select the previously created "DAO.AD" traffic source and choose a traffic type (optional).

- Add a previously created Offer in Voluum (for example, a CPA offer or landing page).

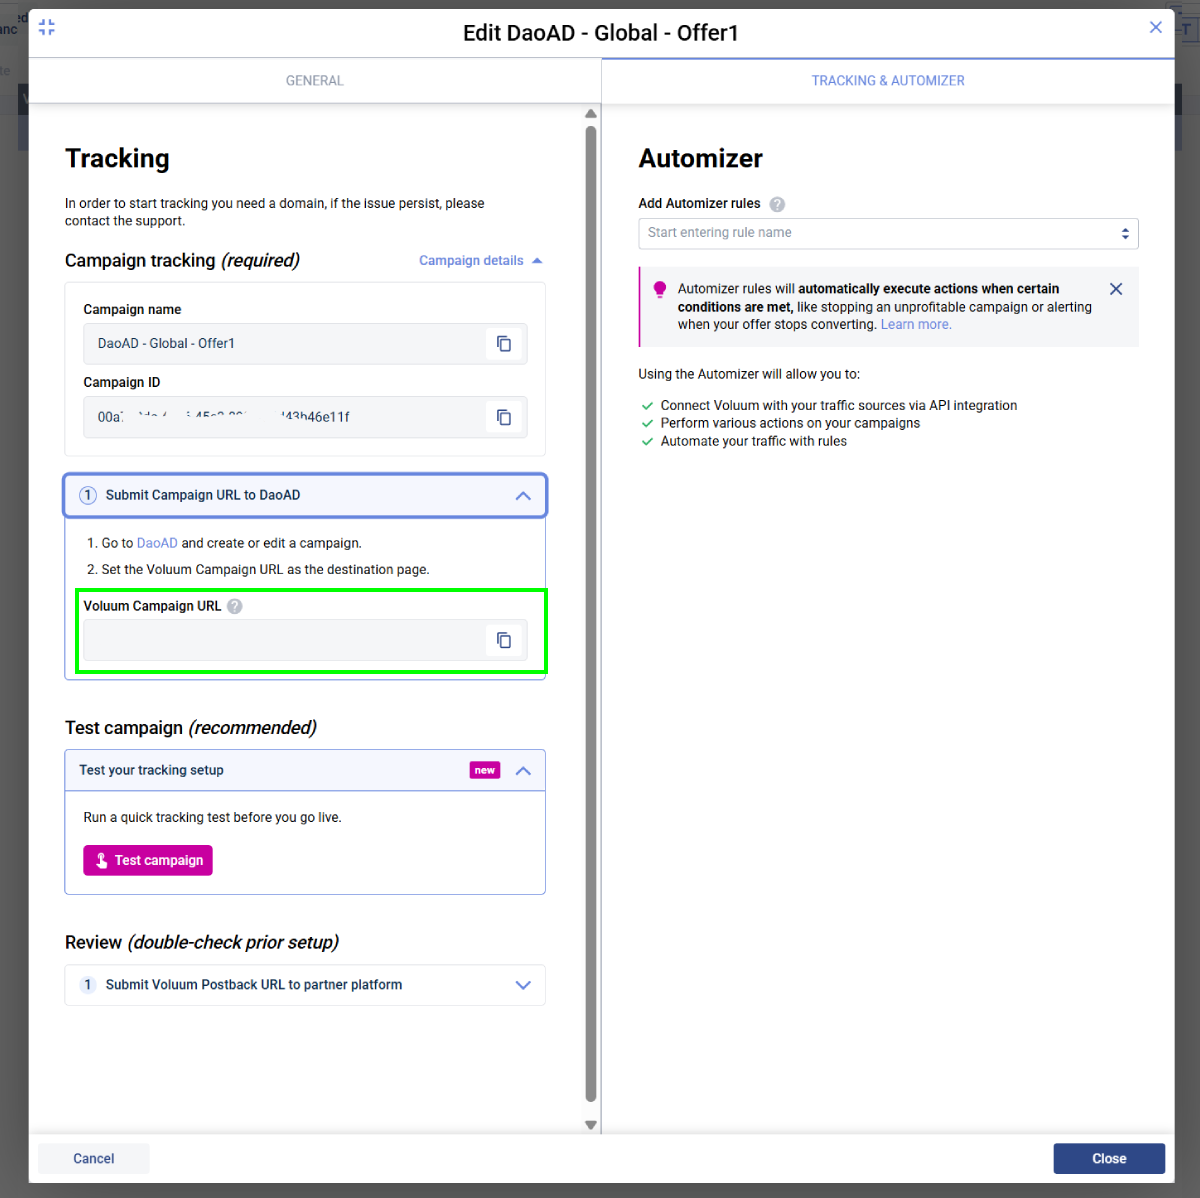
- Open the Tracking & Automizer tab and copy the Voluum Campaign URL.

- Paste the Voluum Campaign URL into the DAO.AD Creative URL field and click Save.
How It Works
- DAO.AD generates a unique click ID and passes it to Voluum.
- Voluum stores the click ID and redirects the user to your offer.
- When a conversion occurs, Voluum sends a postback to DAO.AD containing the original click ID and conversion value.
This allows DAO.AD to attribute conversions to the correct traffic source and optimize campaign performance.
Related
- Keitaro
- Tracking Parameters
- Postback Parameters
- Test a Conversion (HTTP Examples)
- Tracking Configuration Models
- Micro-bidding Tool
Binom
Summary
This guide explains how to integrate Binom with DAO.AD for click tracking and conversion tracking.
Before You Begin
- Role: Advertiser.
- Required information:
- Access to your Binom account
- Estimated time: 5 minutes
Binom Tracking Flow

Steps
- Sign in to Binom.
- Open the "Traffic sources" menu and click "Create".

- Click "Load from template"

- Find "DAO.AD" in the list of predefined templates.

- Replace the placeholder API key with your DAO.AD API key from the DAO.AD Profile page and click Save.

- Go to "Campaigns" menu in Binom.
- Create a campaign connected to your CPA network or landing page.
- Select the previously created "DAO.AD" traffic source.
- Copy the campaign URL by clicking the link icon next to the campaign name.

- Paste the Binom Campaign URL into the DAO.AD Creative URL field and click Save.
How It Works
- DAO.AD generates a unique click ID and passes it to Binom.
- Binom stores the click ID and redirects the user to your offer.
- When a conversion occurs, Binom sends a postback to DAO.AD containing the original click ID and conversion value.
This allows DAO.AD to attribute conversions to the correct traffic source and optimize campaign performance.
Related
- Voluum
- Tracking Parameters
- Postback Parameters
- Test a Conversion (HTTP Examples)
- Tracking Configuration Models
- Micro-bidding Tool
Bemob
Summary
This guide explains how to integrate Bemob with DAO.AD for click tracking and conversion tracking.
Before You Begin
- Role: Advertiser.
- Required information:
- Access to your Bemob account
- Estimated time: 5 minutes
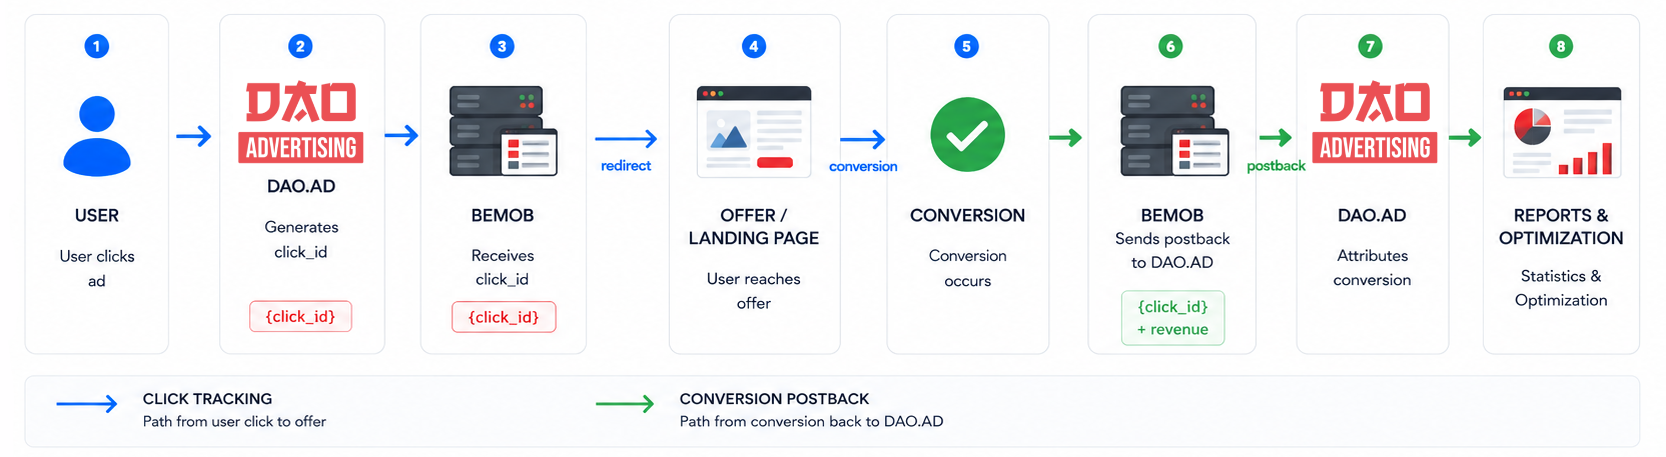
Bemob Tracking Flow
Steps
- Sign in to Bemob.
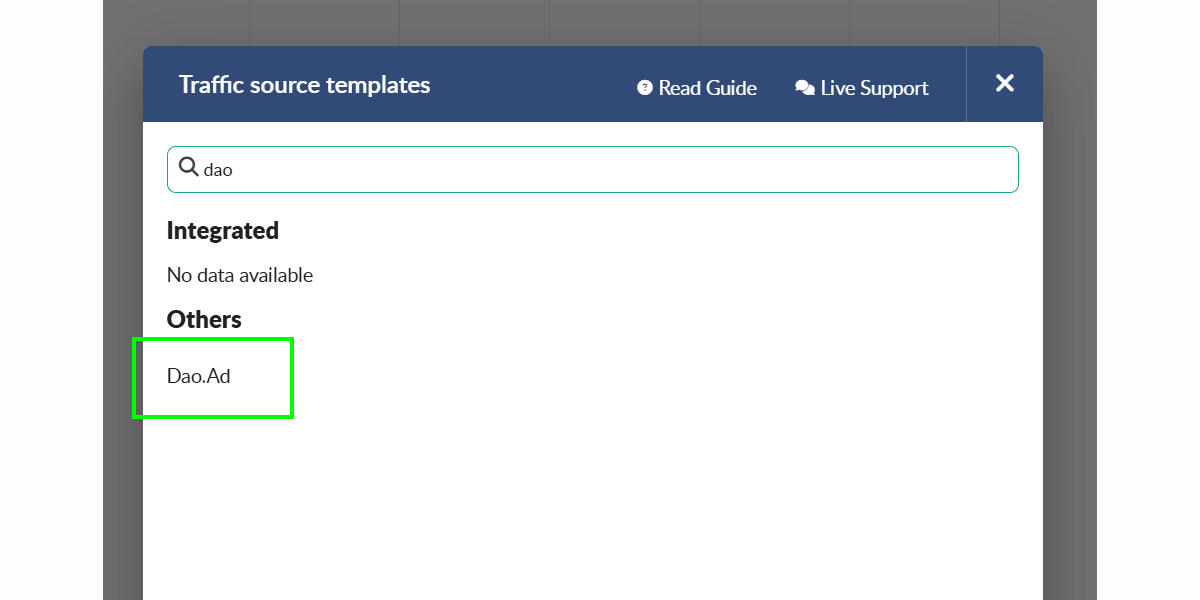
- Open the "Traffic sources" menu and select "New from template".

- Find "DAO.AD" in the list of predefined templates.

- Replace the placeholder API key with your DAO.AD API key from your DAO.AD Profile page and click Save.

- Go to "Campaigns" menu in Bemob.
- Create a campaign connected to your offer or landing page.
- Select the previously created "DAO.AD" traffic source.

- Copy the Campaign URL by clicking the copy icon next to the Campaign URL field.

- Paste the Bemob Campaign URL into the DAO.AD Creative URL field and click Save.
How It Works
- DAO.AD generates a unique click ID and passes it to Bemob.
- Bemob stores the click ID and redirects the user to your offer.
- When a conversion occurs, Bemob sends a postback to DAO.AD containing the original click ID and conversion value.
This allows DAO.AD to attribute conversions to the correct traffic source and optimize campaign performance.
Related
- Binom
- Tracking Parameters
- Postback Parameters
- Test a Conversion (HTTP Examples)
- Tracking Configuration Models
- Micro-bidding Tool
Test a Conversion (HTTP Examples)
Summary
This guide explains how to manually test a conversion postback using a web browser or HTTP request tools. It helps verify that your tracking configuration is working correctly before launching a campaign.
When should you use this?
Use conversion testing when:
- Setting up a new CPA network
- Configuring Keitaro, Binom, Voluum, or another tracker
- Verifying postback parameters
- Troubleshooting missing conversions
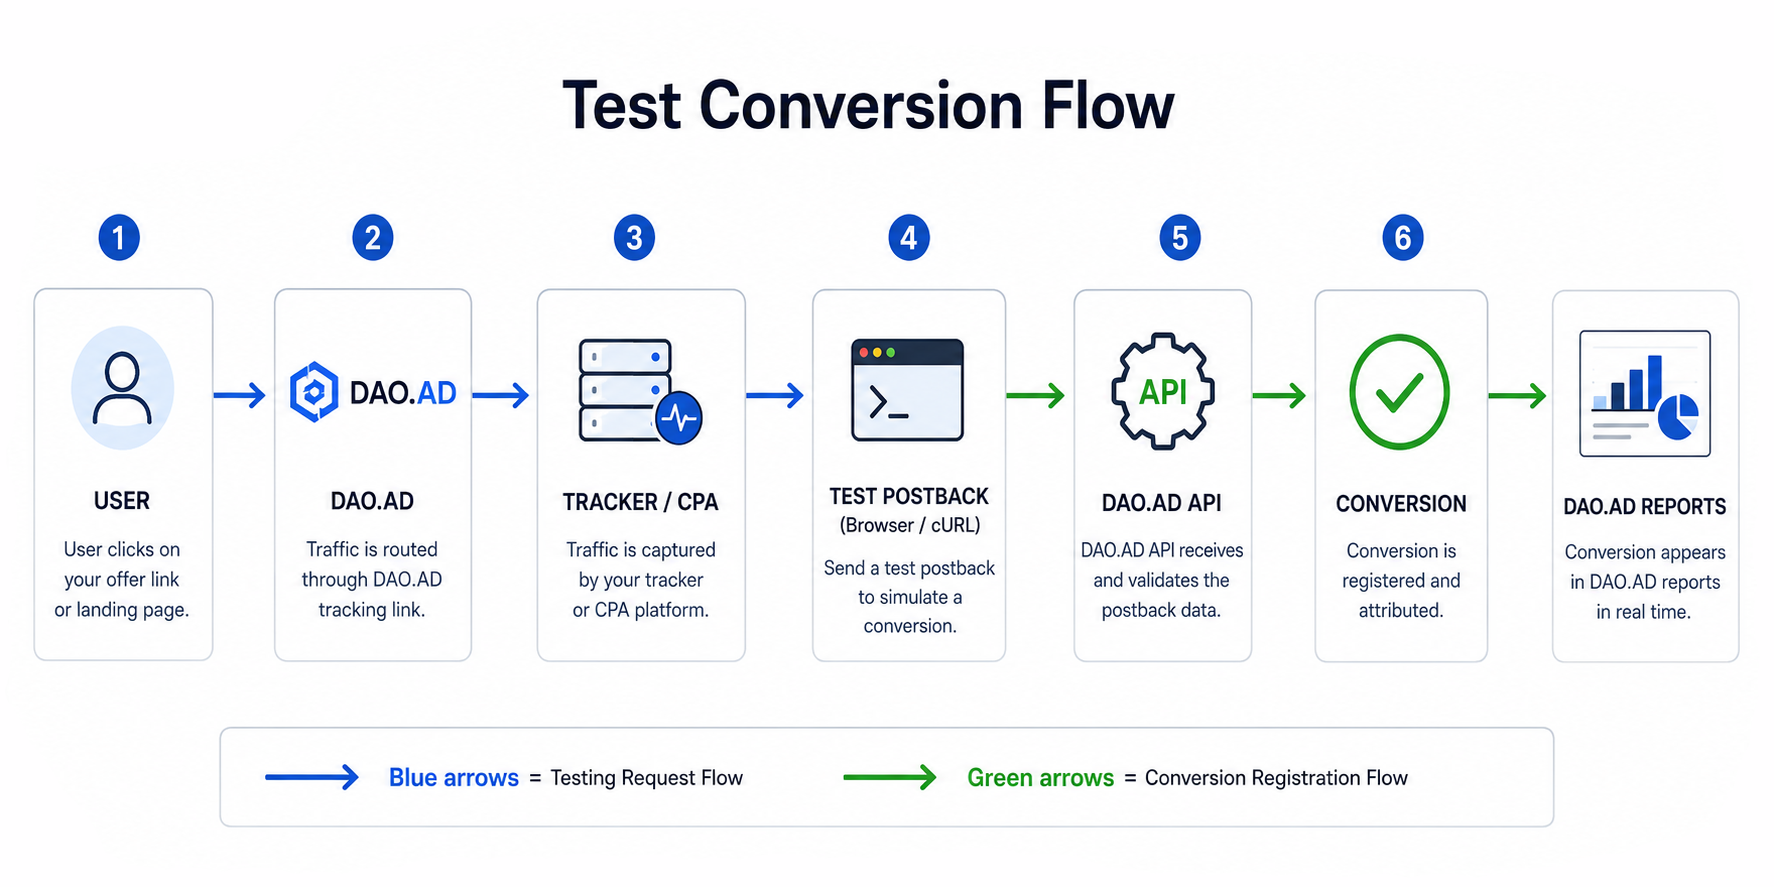
Example DAO.AD Postback URL
http://api.daopush-api.info/api/postback/campaign?
key=YOUR_API_KEY
&sum=1
&click-id=123456789
&type=mainParameter explanation:
| Parameter | Example | Description |
|---|---|---|
| key | YOUR_API_KEY | DAO.AD API key |
| sum | 1 | Conversion payout |
| click-id | 123456789 | Original click ID |
| type | main | Conversion type |
Method 1: Browser Test
Simply open the URL in your browser:
http://api.daopush-api.info/api/postback/campaign?key=YOUR_API_KEY&sum=1&click-id=123456789&type=mainExpected result:
{"status":"success"}or similar success response.
Method 2: cURL Example
Linux / macOS / Windows Terminal
curl "http://api.daopush-api.info/api/postback/campaign?key=YOUR_API_KEY&sum=1&click-id=123456789&type=main"Expected result:
{"status":"success"}Method 3: Keitaro Test
- Open the campaign.
- Find a real Click ID.
- Replace
{external_id}with that Click ID. - Send the postback manually.
- Verify that the conversion appears in DAO.AD statistics.
Method 4: Binom Test
- Open Click Log.
- Copy a valid Click ID.
- Execute the postback URL manually.
- Check DAO.AD Reports.
Common Errors
Invalid API Key
{"status":"error","message":"invalid key"}Solution:
Verify the API key from your DAO.AD Profile page.
Missing Click ID
{"status":"error","message":"click-id not found"}Solution:
Use a valid Click ID generated by DAO.AD.
Duplicate Conversion
{"status":"error","message":"duplicate conversion"}Solution:
Check the TTL parameter or use a new Click ID.