# Integration

# Push Subscription Flow

##### Summary

Learn how the Push advertising format works in DAO.AD, from the visitor's first interaction with your website to subscription collection, ad delivery, and revenue generation.

[![push_subs_flow-1107](https://wiki.dao.ad/uploads/images/gallery/2026-07/scaled-1680-/chatgpt-image-jul-11-2026-01-13-36-pm.png)](https://wiki.dao.ad/uploads/images/gallery/2026-07/scaled-1680-/chatgpt-image-jul-11-2026-01-13-36-pm.png)

##### Overview

The Push subscription process consists of several stages.

1. Visitor opens your website.
2. JavaScript initializes the Push SDK.
3. The browser requests notification permission.
4. The visitor accepts or declines the request.
5. A subscription is created.
6. DAO.AD starts delivering push notifications.
7. You earn revenue from subscriber activity.

##### Stage 1: Visitor opens your website

The visitor loads a page containing the DAO.AD JavaScript code.

The script initializes automatically after the page has finished loading.

##### Stage 2: Permission request

Depending on the selected integration type and display settings, the browser displays a notification permission request.

The visitor can either:

- Allow notifications
- Block notifications

Only visitors who allow notifications become subscribers.

##### Stage 3: Subscriber registration

After permission has been granted:

- the browser generates a Push subscription;
- DAO.AD assigns a unique subscriber identifier;
- the subscriber is securely stored in the DAO.AD platform.

##### Stage 4: Campaign delivery

Once a matching campaign becomes available:

- DAO.AD selects an eligible subscriber;
- the notification is delivered;
- delivery respects frequency caps, targeting, and campaign limits.

##### Stage 5: User interaction

The subscriber may:

- ignore the notification;
- dismiss it;
- click it.

Only clicks redirect the subscriber to the advertiser's landing page.

##### Stage 6: Revenue generation

When the subscriber clicks the notification, DAO.AD records the event and calculates your earnings according to the campaign pricing model.

Revenue is displayed in your statistics and included in future payouts.

##### Best Practices

- Request permission only after the visitor has engaged with your website.
- Avoid showing permission requests immediately after page load.
- Place the JavaScript code on every page where subscriptions should be collected.
- Regularly monitor subscription rates and notification performance.

##### Related

- [JavaScript Tag (Push)](https://wiki.dao.ad/books/integration/page/javascript-tag-push "JavaScript Tag (Push)")
- [Placement Rules](https://wiki.dao.ad/books/getting-started-QiA/page/placement-rules "Placement Rules")
- [Create a Site Source](https://wiki.dao.ad/books/getting-started-QiA/page/create-a-site-source "Create a Site Source")
- [Site/App Approval](https://wiki.dao.ad/books/getting-started-QiA/page/siteapp-approval "Site/App Approval")

# Tags & SDK


# JavaScript Tag (Push)

##### Summary

Generate the JavaScript code required to display the Push ad format on your website. Configure the display settings, generate the script, and add it to your website.

##### Before You Begin

- Role: Webmaster
- Required information:
    - Approved Site traffic source
    - <span style="white-space: pre-wrap;">Access to your website's </span>[HTML](https://wiki.dao.ad/books/terms-g-k/page/html "HTML")<span style="white-space: pre-wrap;"> source code</span>
- Estimated time: 3-5 minutes

<p class="callout warning">****Important!**** JavaScript code is available only for Site traffic sources. If your source type is Link, create and approve a Site Source before continuing.</p>

##### Steps

1. Open your approved Site source of Push. After your Site Source has been approved, navigate to Sources - Push and open the source that will be used for the Push format.
2. <span style="white-space: pre-wrap;">Open the Code page and click Code to open the </span>[JavaScript](https://wiki.dao.ad/books/terms-g-k/page/javascript "JavaScript")<span style="white-space: pre-wrap;"> code configuration settings.</span>
3. Configure the following parameters:  
    \- Click ID for postback - if you want to track conversion through postback  
    \- Redirect Count - Maximum number of redirects before the user is subscribed. We recommend using no more than 5 redirects.  
    \- Decline Count - Maximum number of declined subscription attempts before redirecting the user to the Trafficback URL. We recommend using the default value.  
    \- Full-screen Mode - Enable or disable full-screen display on the landing page.  
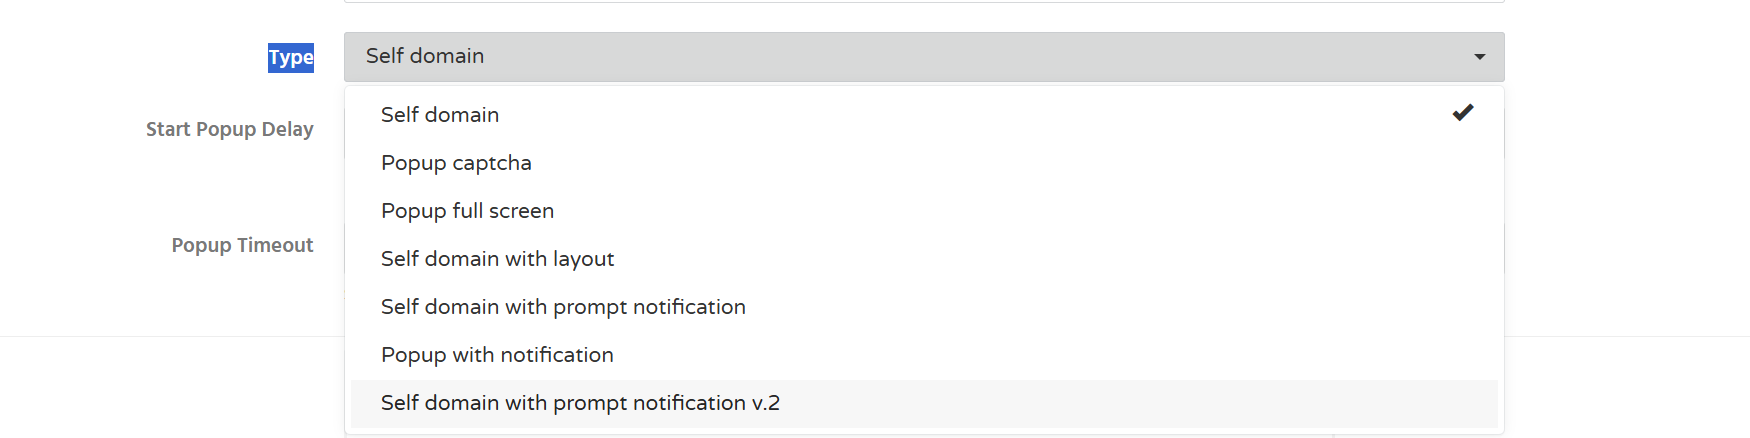
    \- Landing Page Type - Select one of the available landing page types.![image.png](https://wiki.dao.ad/uploads/images/gallery/2026-07/scaled-1680-/image.png)- Start Popup Delay - Time (in seconds) before the first popup appears.  
    \- Popup Timeout - Time interval (in seconds) between popup displays.
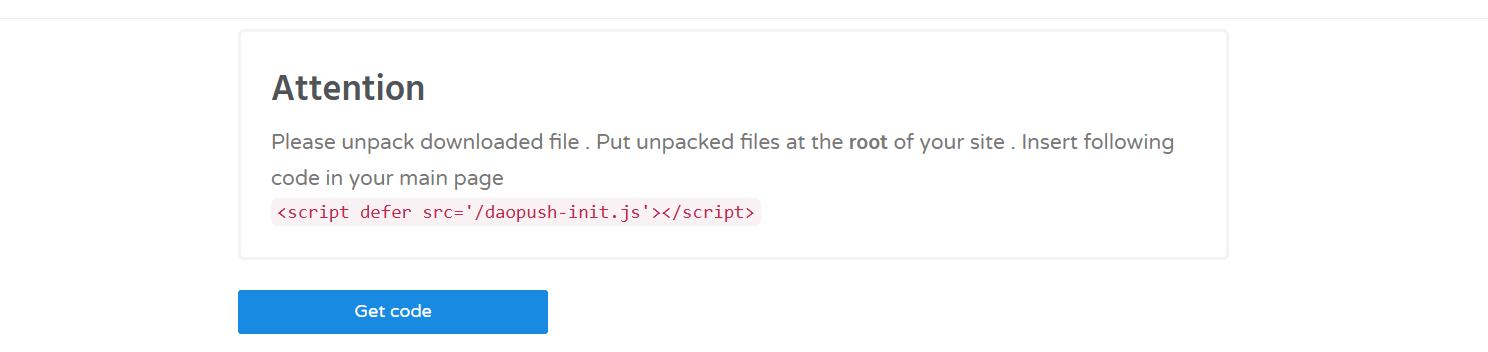
4. Download the generated code archive, extract it, and upload the script files to your website's root directory.![image.png](https://wiki.dao.ad/uploads/images/gallery/2026-07/scaled-1680-/eHMimage.png)
5. Subscriber collection begins once visitors allow push notifications on your website.

##### Troubleshooting

****Issue:**** The Code button is unavailable.

****Solutions:**** If you have not received the authorization code.  
Verify that:

- your Site Source has been approved;
- <span style="white-space: pre-wrap;">the source type is </span>****Site****;
- you have permission to access the source.

##### Related

- [Site vs Link](https://wiki.dao.ad/books/getting-started-QiA/page/site-vs-link "Site vs Link")
- [Create a Site Source](https://wiki.dao.ad/books/getting-started-QiA/page/create-a-site-source "Create a Site Source")
- [Site/App Approval](https://wiki.dao.ad/books/getting-started-QiA/page/siteapp-approval "Site/App Approval")

# JavaScript Tag (Inpage Push)

##### Summary

<span style="white-space: pre-wrap;">Generate the </span>[JavaScript](https://wiki.dao.ad/books/terms-g-k/page/javascript "JavaScript")<span style="white-space: pre-wrap;"> code required to display the In-Page Push ad format on your website. Configure the display settings, generate the script, and add it to your website.</span>

##### Before You Begin

- Role: Webmaster
- Required information:
    - Approved Site traffic source
    - <span style="white-space: pre-wrap;">Access to your website's </span>[HTML](https://wiki.dao.ad/books/terms-g-k/page/html "HTML")<span style="white-space: pre-wrap;"> source code</span>
- Estimated time: 3-5 minutes

<p class="callout warning">****Important!**** JavaScript code is available only for Site traffic sources. If your source type is Link, create and approve a Site Source before continuing.</p>

##### Steps

1. Open your approved Site source of Inpage Push. After your Site Source has been approved, navigate to Sources - Push InPage and open the source you want to use.
2. Open the Code page and click Code to open the JavaScript code configuration settings.
3. Configure the following parameters:  
    \- Type - Choose how the JavaScript code will be generated. Download Script - Downloads a JavaScript file that must be uploaded to your website's root directory. Inject Script - Displays the JavaScript code that can be copied and pasted directly into your website.  
    \- Position Y - Choose whether the In-Page Push notification appears at the top or bottom of the screen.  
    \- Position X - Choose whether the notification appears on the left or right side of the screen.  
    \- Max Ad Count - Maximum number of In-Page Push messages displayed on the same time.  
    \- Delay Before First Show - Time (in seconds) before the first In-Page Push message is displayed.  
    \- Delay Before Next Show - Time (in seconds) before the next message is displayed.  
    \- Renew Ad Interval - Time (in seconds) before the current advertisement is refreshed.  
    \- Pulse Interval - Time interval (in seconds) between pulse animations.
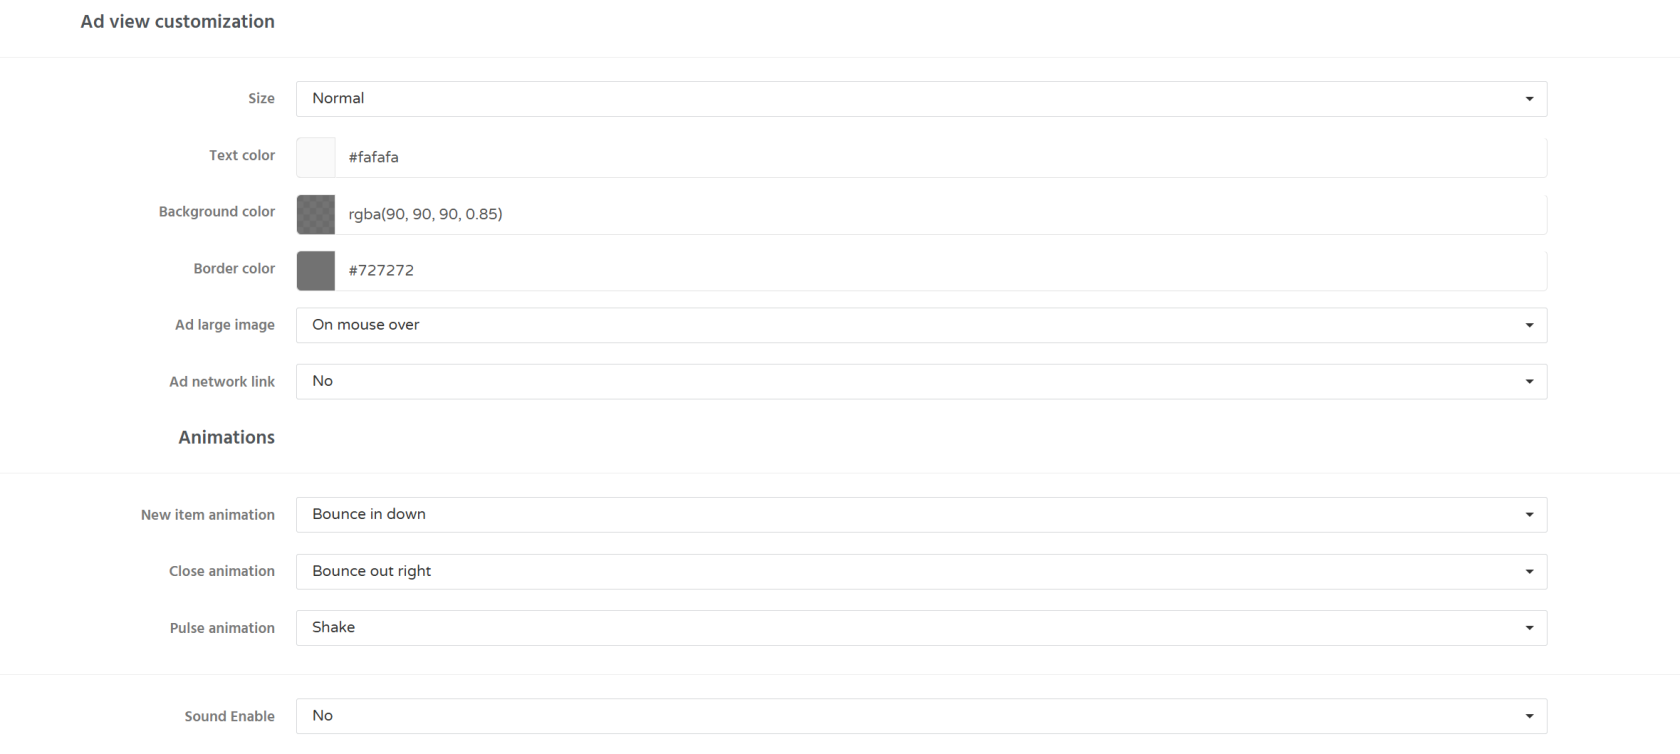
4. You can also customize the appearance and behavior of your In-Page Push message using the settings below.[![image.png](https://wiki.dao.ad/uploads/images/gallery/2026-07/scaled-1680-/cXPimage.png)](https://wiki.dao.ad/uploads/images/gallery/2026-07/cXPimage.png)
5. Download the generated code archive, extract it, and upload the script files to your website's root directory.
6. Subscriber collection begins once visitors allow push notifications on your website.

##### Troubleshooting

****Issue:**** The downloaded script does not work.

****Solutions:**** Check whether a VPN, browser extension, or another JavaScript library is preventing the script from loading correctly.

##### Related

- [Site vs Link](https://wiki.dao.ad/books/getting-started-QiA/page/site-vs-link "Site vs Link")
- [Create a Site Source](https://wiki.dao.ad/books/getting-started-QiA/page/create-a-site-source "Create a Site Source")
- [Site/App Approval](https://wiki.dao.ad/books/getting-started-QiA/page/siteapp-approval "Site/App Approval")
- [Placement Rules](https://wiki.dao.ad/books/getting-started-QiA/page/placement-rules "Placement Rules")

# JavaScript Tag (Popunder)

##### Summary

<span style="white-space: pre-wrap;">Generate the </span>[JavaScript](https://wiki.dao.ad/books/terms-g-k/page/javascript "JavaScript")<span style="white-space: pre-wrap;"> code required to display the Popunder ad format on your website. Configure the display behavior, generate the script, and add it to your website pages.</span>

##### Before You Begin

- Role: Webmaster
- Required information:
    - Approved Site traffic source
    - <span style="white-space: pre-wrap;">Website with access to the </span>[HTML](https://wiki.dao.ad/books/terms-g-k/page/html "HTML")<span style="white-space: pre-wrap;"> source</span>
- Estimated time: 3-5 minutes

<p class="callout warning">****Important!**** <span style="white-space: pre-wrap;">JavaScript code is available only for </span>****Site**** <span style="white-space: pre-wrap;">traffic sources. If your traffic source type is </span>****Link****, create and approve a Site Source before continuing.</p>

##### Steps

1. Open your approved Site source. After your Site Source has been approved, navigate to: Sources - Your Source. Open the source that will be used for the Popunder format.
2. Open the Code page. Click the Code button to open the JavaScript code configuration page.
3. Select the display type![site_code_v060726.jpg](https://wiki.dao.ad/uploads/images/gallery/2026-07/scaled-1680-/site-code-v060726.jpg)

4. 1. Pop Up
    2. Pop Under
    3. Tab Up
    4. Tab Under
5. Configure the display frequency. Select how often the script can display an advertisement to the same visitor.![site_code_v060726.png](https://wiki.dao.ad/uploads/images/gallery/2026-07/scaled-1680-/site-code-v060726.png)Possible time range: 30 minutes – 24 hours

6. Configure the delay. Specify how many seconds should pass before the first advertisement is displayed.![site_code_v060726 (1).png](https://wiki.dao.ad/uploads/images/gallery/2026-07/scaled-1680-/site-code-v060726-1.png)

7. Configure UTM parameters (optional). This helps identify traffic sources in your analytics platform.![site_code_v060726 (2).png](https://wiki.dao.ad/uploads/images/gallery/2026-07/scaled-1680-/site-code-v060726-2.png)

8. Generate the JavaScript code. Click Get Script.![site_code_v060726 (3).png](https://wiki.dao.ad/uploads/images/gallery/2026-07/scaled-1680-/site-code-v060726-3.png)

9. Copy the entire generated code.
10. <span style="white-space: pre-wrap;">Install the code. Paste the generated JavaScript immediately before the closing </span>`<span class="editor-theme-code"></body></span>`<span style="white-space: pre-wrap;"> tag on every page where Popunder ads should be displayed.</span>
11. After the code is published on your website, traffic will start being monetized automatically.

##### Troubleshooting

****Issue:**** The Code button is unavailable.

****Solutions:**** If you have not received the authorization code.  
Verify that:

\- your traffic source has been approved;  
\- the source type is Site;  
\- you have permission to access the source.

****Issue:****<span style="white-space: pre-wrap;"> Advertisements are not displayed.</span>

****Solution:****

Check that:

- <span style="white-space: pre-wrap;">the JavaScript code is installed before the closing </span>`<span class="editor-theme-code"></body></span>`<span style="white-space: pre-wrap;"> tag;</span>
- browser extensions or ad blockers are disabled during testing;
- the website is publicly accessible;
- <span style="white-space: pre-wrap;">the selected ad format is </span>****Pop Under****.

##### Related

- [Site vs Link](https://wiki.dao.ad/books/getting-started-QiA/page/site-vs-link "Site vs Link")
- [Create a Site Source](https://wiki.dao.ad/books/getting-started-QiA/page/create-a-site-source "Create a Site Source")
- [Site/App Approval](https://wiki.dao.ad/books/getting-started-QiA/page/siteapp-approval "Site/App Approval")
- [JavaScript Tag (Push)](https://wiki.dao.ad/books/integration/page/javascript-tag-push "JavaScript Tag (Push)")
- [Placement Rules](https://wiki.dao.ad/books/getting-started-QiA/page/placement-rules "Placement Rules")

</body>

# JavaScript Tag (Video)

##### <span style="color: rgb(0, 0, 0);">Summary</span>

<span style="color: rgb(0, 0, 0); white-space: pre-wrap;">Generate the </span>[JavaScript](https://wiki.dao.ad/books/terms-g-k/page/javascript "JavaScript")<span style="color: rgb(0, 0, 0); white-space: pre-wrap;"> code required to display the Video ad format on your website. Configure the display settings, generate the script, and add it to your website.</span>

##### <span style="color: rgb(0, 0, 0);">Before You Begin</span>

- <span style="color: rgb(0, 0, 0);">Role: Webmaster</span>
- <span style="color: rgb(0, 0, 0);">Required information:</span>
    - <span style="color: rgb(0, 0, 0);">Approved Site traffic source</span>
    - <span style="color: rgb(0, 0, 0); white-space: pre-wrap;">Access to your website's </span>[HTML](https://wiki.dao.ad/books/terms-g-k/page/html "HTML")<span style="color: rgb(0, 0, 0); white-space: pre-wrap;"> source code</span>
- <span style="color: rgb(0, 0, 0);">Estimated time: 3-5 minutes</span>

<p class="callout warning">****Important!**** <span style="color: rgb(0, 0, 0); white-space: pre-wrap;">JavaScript code is available only for Site traffic sources. If your source type is </span>****Link****<span style="color: rgb(0, 0, 0); white-space: pre-wrap;">, create and approve a </span>****Site**** <span style="color: rgb(0, 0, 0);">Source before continuing.</span></p>

##### <span style="color: rgb(0, 0, 0);">Steps</span>

1. <span style="color: rgb(0, 0, 0);">After your Site Source has been approved, navigate to Sources - Video and open the source you want to use.</span>
2. <span style="color: rgb(0, 0, 0);">Open the Code page and click Code to open the JavaScript code configuration settings.</span>
3. <span style="color: rgb(0, 0, 0);">Configure the following parameters:</span>  
    <span style="color: rgb(0, 0, 0);">Type - Select one of the available video integration modes:</span>  
    <span style="color: rgb(0, 0, 0);">a) VAST Ad Link</span>  
    <span style="color: rgb(0, 0, 0);">b) Video Player (Pre-roll)</span>  
    <span style="color: rgb(0, 0, 0);">c) Slider Ad</span>  
    <span style="color: rgb(0, 0, 0);">d) Video Pre-roll + Slider</span>  
    \<span style="color: rgb(0, 0, 0);">- Container ID - ID of the HTML element where the video player will be inserted.</span>  
    \<span style="color: rgb(0, 0, 0);">- Position Y - Choose whether the video player appears at the top or bottom of the page.</span>  
    \<span style="color: rgb(0, 0, 0);">- Position X - Choose whether the video player appears on the left or right side of the page.</span>  
    \<span style="color: rgb(0, 0, 0); background-color: rgb(255, 255, 255);">- Size - Select the size of the video player.</span>  
    \<span style="color: rgb(0, 0, 0); background-color: rgb(255, 255, 255);">- Count video - Maximum number of video ads shown in sequence.</span>  
    \<span style="color: rgb(0, 0, 0);">- Max Ad View Count - Maximum number of times the Slider Ad can be displayed.</span>  
    \<span style="color: rgb(0, 0, 0);">- Pause Before End - Number of seconds before the end of the video when playback is paused.</span>  
    \<span style="color: rgb(0, 0, 0);">- Renew Slider Ad Interval - Time interval (in seconds) before the Slider Ad is refreshed.</span>  
    \<span style="color: rgb(0, 0, 0);">- Volume - Default playback volume for the video.</span>
4. <span style="color: rgb(0, 0, 0);">You can also customize the appearance and animations of the video player using the settings below.</span>![image.png](https://wiki.dao.ad/uploads/images/gallery/2026-07/scaled-1680-/fx4image.png)
5. <span style="color: rgb(0, 0, 0);">Click Get Code to generate the JavaScript code, then copy and paste it into your website.</span>

##### <span style="color: rgb(0, 0, 0);">Troubleshooting</span>

****Issue:**** <span style="color: rgb(0, 0, 0);">The downloaded script does not work.</span>

****Solutions:**** <span style="color: rgb(0, 0, 0);">Check whether a VPN, browser extension, or another JavaScript library is preventing the script from loading correctly.</span>

##### <span style="color: rgb(0, 0, 0);">Related</span>

- [<span style="color: rgb(224, 62, 45);">Site vs Link</span>](https://wiki.dao.ad/books/getting-started-QiA/page/site-vs-link "Site vs Link")
- [<span style="color: rgb(224, 62, 45);">Create a Site Source</span>](https://wiki.dao.ad/books/getting-started-QiA/page/create-a-site-source "Create a Site Source")
- [<span style="color: rgb(224, 62, 45);">Site/App Approval</span>](https://wiki.dao.ad/books/getting-started-QiA/page/siteapp-approval "Site/App Approval")
- [Placement Rules](https://wiki.dao.ad/books/getting-started-QiA/page/placement-rules "Placement Rules")