Getting Started
- Account & Access
- First Campaign
- Create a push campaign
- Create an in-page push campaign
- Create a Pop Campaign
- Create Video Campaign
- Targeting by country
- Targeting by operating system
- Targeting by browser
- Targeting by vertical
- Targeting by age of subscription
- Targeting by traffic quality and category
- Campaign Limits and Capping
- Campaign delivery time
- Domain Volumes Video
Account & Access
Create an account as Advertiser
Summary
Create your Advertiser account on DAO.AD to start launching advertising campaigns.
Before You Begin
- Role: Advertiser
- Required information:
- Email address
- Password
- Telegram username
- Estimated time: 5 minutes
Steps
- Open the DAO.AD homepage and click Registration.
- At the top of the registration form, select Advertiser. The selected role will be highlighted in red.

- Enter the following information Email, Password, Password Confirmation, Telegram.
Note: We use your Telegram contact to reach you quickly if needed.

4. Complete the "I'm not a robot" CAPTCHA and check the box to accept Privacy Policy & Terms of Use. 
5. Click Register.
Verification
After successful registration, an activation code will be sent to your email address. Enter this code to verify your account and activate access to the platform.
Related
Account verification
Summary
Verify your account using the activation code sent to your email address.
Before You Begin
- Role: Advertiser
- Required information:
- Confirmation code
- Estimated time: 1 minute
Steps
- After completing Registration, a confirmation email will be sent to your email address.
- Check your inbox and make sure the sender name is DAO.AD Robot and the email address is no-reply[@]dao.ad.
- Click the verification link in the email.
Important: Never share your activation link or activation code with anyone. DAO.AD managers will never ask for your confirmation codes or passwords.

4. After successful verification, you will be redirected to the Authorization page.
Troubleshooting
Issue: Activation code not received
Solution: If you have not received the activation code, check your Spam folder. If the email is still missing, contact DAO.AD Support.
Issue: Incorrect account type selected
Solution: If you selected the wrong account role during registration, contact DAO.AD Support for assistance.
Related
Two-factor authentication
Summary
Log in to the DAO.AD Dashboard using Two-Factor authentication (2FA).
Before You Begin
- Role: Advertiser
- Required information:
- 2FA code
- Estimated time: 2 minutes
Steps
- After entering your email address and password, a 2FA code will be sent to your email address.
- Check your inbox and make sure the sender is DAO.AD Robot and the email address is no-reply[@]dao.ad.
- Copy the authentication code from the email.
Important: Never share your authorization code with anyone. DAO.AD managers will never ask for your confirmation codes or passwords.

4. After successful authorization, you will be redirected to the DAO.AD Dashboard.
Troubleshooting
Issue: Authorization code not received
Solutions: If you have not received the authorization code
- check your Inbox and Spam folder;
- make sure you entered the correct email address and password;
- try logging in using a different browser;
- contact DAO.AD Support
Issue: Authorization code expired
Solution: Restart the authorization process and request a new code.
Related
Password recovery
Summary
Recover your DAO.AD password if you forgot or lost access to it.
Before You Begin
- Role: Advertiser
- Required information:
- Email address
- Email address
- Estimated time: 3 minutes
Steps
- Enter the email address associated with your DAO.AD account.

- Check your inbox and Spam folder. The recovery email will be sent from no-reply[@]dao.ad.
- Click to the recovery link in email.
Important: Never share your recovery link with anyone. DAO.AD managers will never ask for your confirmation codes or passwords.
4. Enter your new password, complete the “I’m not a robot” verification, and click Restore.
Password should contain at least 6 characters.

Troubleshooting
Issue: Recovery link not received
Solutions: If you have not received the authorization code
- check your Inbox and Spam folder;
- make sure you entered the correct email address;
- try logging in using a different browser;
- contact DAO.AD Support
Issue: Authorization code expired
Solution: Restart the authorization process and request a new code.
Related
First Campaign
Create a push campaign
Summary
Create your advertising campaign and start buying traffic on DAO.AD.
Before You Begin
- Role: Advertiser.
- Required information:
- Campaign name
- Campaign pricing model
- Estimated time: 7-10 minutes
Steps
- In the top menu, go to Campaigns → Push.

- Click the "Create Campaign" button.
- Enter the campaign name and select the campaign mode.

Information: All newly created campaigns are set to Paused by default to prevent unintended traffic spending.
4. Scroll down to configure the remaining campaign settings and save the campaign.
Troubleshooting
Issue: Campaigns menu is missing
Solutions: If you do not see the Campaigns menu, your account may be registered as a Webmaster account. Contact DAO.AD Support for assistance.
Issue: Unable to select a different campaign mode
Solution: DAO.AD Push campaigns currently support only the CPC pricing model.
Related
- Create an in-page push campaign
- Targeting by country
- Blacklist and Whitelist Targeting
- Create Creative Push and Inpage Push
Create an in-page push campaign
Summary
Create your advertising campaign and start buying traffic on DAO.AD.
Before You Begin
- Role: Advertiser.
- Required information:
- Campaign name
- Campaign pricing model
- Estimated time: 7-10 minutes
Steps
- In the top menu, go to Campaigns → Push InPage.

- Click the "Create Campaign" button.
- Enter the campaign name and select the campaign mode.
Information: All newly created campaigns are set to Paused by default to prevent unintended traffic spending.
4. Scroll down to configure the remaining campaign settings and save the campaign.
Troubleshooting
Issue: Campaigns menu is missing
Solutions: If you do not see the Campaigns menu, your account may be registered as a Webmaster account. Contact DAO.AD Support for assistance.
Issue: Unable to select a different campaign mode
Solution: DAO.AD Push In-Page campaigns currently support only the CPC pricing model.
Related
- Create a push campaign
- Targeting by country
- Blacklist and Whitelist Targeting
- Create Creative Push and Inpage Push
Create a Pop Campaign
Summary
Unlike push campaigns, Pop campaigns do not require graphical creatives.
A Pop campaign only requires a valid destination URL that will be opened when the advertisement is triggered.
Before You Begin
- Role: Advertiser.
- Required information:
- Destination URL
- Estimated time: 10 minutes
Steps
- Navigate to Campaigns and select Popunder from the campaign type list.
- Click the Create Campaign button.
- Enter the campaign name and destination URL, then select the appropriate tracking template.

- Configure your targeting options and bidding settings.
- Configure the Smart Type settings, if required. Available options Smart CPM and CPA Goal.
- Save the campaign. Once submitted, it will be reviewed by the DAO.AD moderation team.
Troubleshooting
Issue: Unable to save the campaign.
Solutions:
- Verify that all required campaign settings are configured.
- Ensure that all required fields, including Campaign Name, Destination URL, and Bid, are completed.
- If the issue persists, contact DAO.AD Support.
Related
Create Video Campaign
Summary
Learn how to create a Video campaign in DAO.AD by uploading a video creative and configuring campaign settings.
Before You Begin
- Role: Advertiser.
- Required information:
- Video creative
- Destination URL
- Estimated time: 5-10 minutes
Steps
- Navigate to Campaigns and select Video from the campaign type list.
- Click the Create Campaign button.
- Enter the campaign name and keep Default selected as the campaign source type.
- Configure your targeting options and bidding settings.
- Set the Black list or White list, if needs. Check the Domain Volume Video to get the list of sources you wish target to.
- Scroll down to the Select creative block and click Add creative.
- Enter a creative title and select Video as the creative type.
- Upload your video file from your computer. DAO.AD automatically generates all supported aspect ratios required for video placements.
- Enter the destination URL. You may also include tracking parameters or macros if required.

- Save the campaign. Once submitted, it will be reviewed by the DAO.AD moderation team.
- Once uploaded, the creative will appear in the Creatives section of your campaign.

- Save the campaign and wait for the moderation process to complete.
Note: Video campaigns support Sum per Source, allowing you to define the maximum budget that can be spent on each individual traffic source.
Troubleshooting
Issue: My ads does not receive traffic.
Solutions
- Verify that the video creative has been uploaded successfully.
- Verify that the destination URL is valid.
- Ensure that the campaign status is Active.
- Ensure that your account balance is sufficient.
- Verify that your targeting settings are not overly restrictive.
Related
- Create VAST link
- Create Youtube Campaign
- Examples of good creatives
- Tracking Configuration Models
- Domain Volumes Video
Targeting by country
Summary
Country targeting allows you to receive traffic from specific countries or predefined country groups.
Before You Begin
- Role: Advertiser
- Required information:
- country names, ISO country codes, or predefined country groups
- Estimated time: 1-3 minutes
Steps
- On the campaign creation page, locate the Targeting section and the Country block.
- You can configure countries using one of the following methods.
Option 1: Enter country names or ISO codes
- enter one or more country names or ISO two-letter country codes separated by commas, then click Apply.

- Update the country set by selecting one of the following options:
Add items - adds the selected countries to the current list;
Replace items - replaces the current list with the selected countries.
Option 2: Use predefined country groups
- select one of the predefined country groups available in the system

- Update the country set by choosing Add items or Replace items
Option 3: Select countries from the dropdown list
- Select countries individually from the dropdown list

- changes are applied automatically
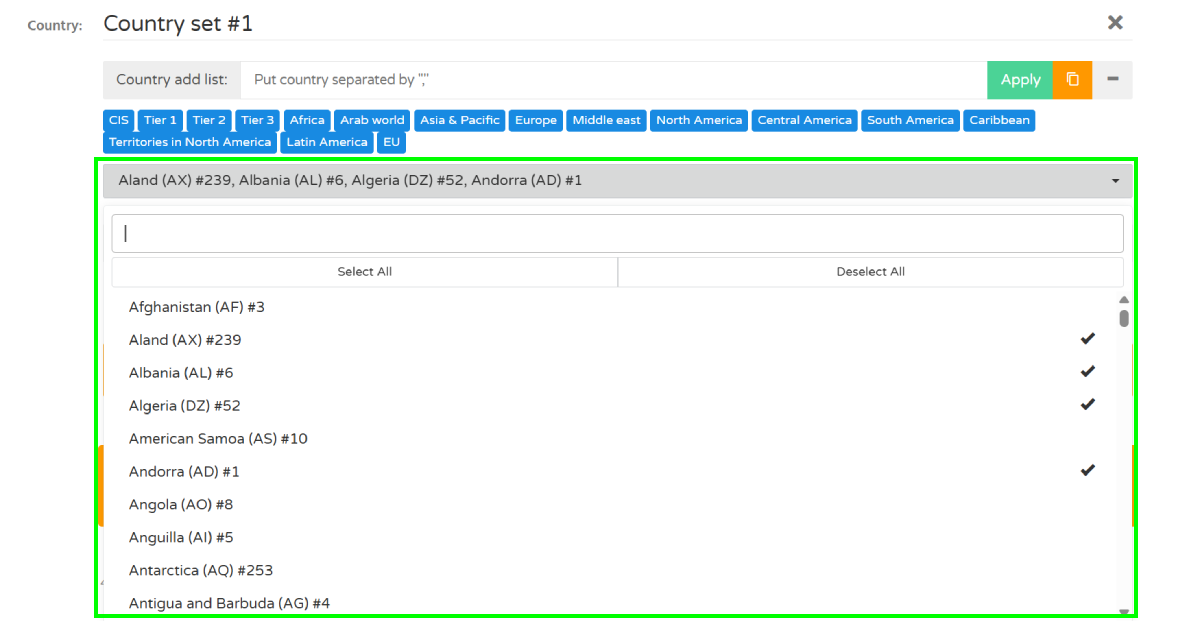
3. Enter the bid value for the selected country set. Price per 1000 clicks

You can create up to 10 country sets within a single campaign. Use Add Country Set to assign different bids to different GEO groups.
Troubleshooting
Issue: Country not found
Solutions: If you can not find country name
- verify the country's ISO two-letter code.
- make sure the country name is entered in English using Latin characters.
Issue: Selected countries are not receiving traffic
Solution:
- Verify that the campaign status is Active.
- Check your bid amount.
- Make sure the selected countries contain available traffic.
- Review other targeting restrictions such as OS, browser, or whitelist settings.
Related
- Targeting by operating system
- Traffic volume and bid recomendations
- Targeting by vertical
- Micro-bidding Tool
Targeting by operating system
Summary
Targeting by Operating System allows you to receive traffic from specific users who have targeted operational systems.
Before You Begin
- Role: Advertiser
- Required information:
- selected operating systems
- Estimated time: 1 minute
Steps
- On the campaign creation page, locate the Targeting section and the User OS block.
- Select one or more operating systems from the dropdown list.
- Select one or more operating systems.

Information: Use All Desktop OS to target all desktop operating systems. Use All Mobile OS to target all mobile operating systems.
Troubleshooting
Issue: Selected operating systems are not receiving traffic
Solution:
- Verify that the campaign status is Active.
- Check your bid amount.
- Make sure traffic is available for the selected operating systems.
- Review other targeting restrictions such as countries, browser, or whitelist settings.
Related
Targeting by browser
Summary
Browser targeting allows you to receive traffic from users who use specific web browsers.
Before You Begin
- Role: Advertiser
- Required information:
- selected web browsers
- Estimated time: 2 minute
Steps
- On the campaign creation page, locate the Targeting section and the User Browser block.
- Select one or more browsers from the dropdown list.

Troubleshooting
Issue: Selected browsers are not receiving traffic
Solution:
- Verify that the campaign status is Active.
- Check your bid amount.
- Make sure traffic is available for the selected browsers.
- Review other targeting restrictions, including operating system, GEO targeting, and whitelist settings.
Related
- Targeting by vertical
- Traffic volume and bid recommendations
- Targetting by operating system
- Fund Your Account
Targeting by vertical
Summary
Use vertical targeting to receive traffic from publishers whose audience matches selected verticals.
Before You Begin
- Role: Advertiser
- Required information:
- selected verticals
- Estimated time: 1 minute
Steps
- On the campaign creation page, locate the Targeting section and the Vertical field.
- Select one or more verticals from the dropdown list.

Troubleshooting
Issue: Unable to select multiple verticals
Solution:
- to target multiple verticals, select Mix at the bottom of the dropdown list.
Related
Targeting by age of subscription
Summary
Subscription age targeting allows you to receive traffic from users based on the age of their push subscription.
Before You Begin
- Role: Advertiser
- Required information:
- subscription age range
- available for Push campaigns only
- Estimated time: 1 minute
Steps
- On the campaign creation page, locate the Targeting section and the Age of subsciption field.
- Select one or more subscription age ranges from the dropdown list.

Information: you can target users with subscription ages of 1-3, 4-7, 8-15, or 16+ days. Subscription age is calculated from the date when a user subscribed to push notifications.
Troubleshooting
Issue: Unable to select custom subsription age.
Solution:
- only the predefined subscription age ranges available in the dropdown list can be selected.
Verification
After saving the campaign, the selected categories and traffic quality levels will appear in the campaign targeting settings.
Related
Targeting by traffic quality and category
Summary
Traffic Quality targeting allows you to select the quality level of incoming traffic. Category targeting allows you to filter traffic sources by content category, such as Mainstream, Racy, or Adult.
Before You Begin
- Role: Advertiser
- Required information:
- traffic quality
- traffic category
- Estimated time: 1 minute
Steps
- On the campaign creation page, locate the Targeting section and the Category field.
- Select one or more categories from the dropdown list.

Information: Racy content may contain sexually suggestive material but is generally less explicit than Adult content.
- Select one or more traffic quality levels from the dropdown list.

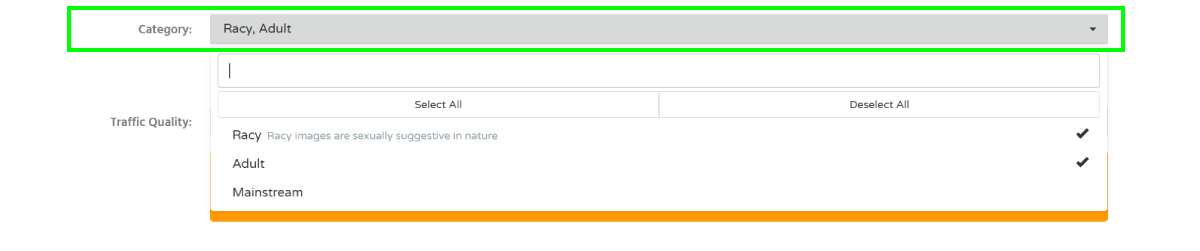
We recommend using High or Premium traffic quality for better performance.
Troubleshooting
Issue: My creatives were rejected due to prohibited content.
Solution:
- if your creatives contain adult or sexually suggestive content, make sure the appropriate traffic category (Adult or Racy) is selected.
Verification
After saving the campaign, the selected categories and traffic quality levels will appear in the campaign targeting settings.
Related
- Traffic Type
- Targeting by country
- Targeting by operating system
- Targeting by vertical
- Create an in-page push campaign
Campaign Limits and Capping
Summary
Use campaign limits to control your budget and traffic volume. DAO.AD allows you to configure daily and total limits for clicks, impressions, and campaign spend.
Before You Begin
- Role: Advertiser
- Estimated time: ~2 minutes
Steps
- Locate the Limits section at the bottom of the page.
- Available settings:
- Frequency Capping - сontrols how many times a unique user can see your push advertisement within 24 hours;
- Limit on charge - total budget for this ad campaign
- Limit on shows - maximum number of impressions for this campaign
- Limit on clicks - total clicks for this ad campaign

Information: We recommend setting limits slightly higher than your target values. Push notifications may still generate impressions or clicks after delivery has already been initiated
- The following daily limits can be configured:
- Limit on charge - total budget for this ad campaign
- Limit on shows - total impressions for this ad campaign
- Limit on clicks - total clicks for this ad campaign
Feature: You can also configure click and budget limits for individual traffic sources.
Troubleshooting
Issue: campaign spend exceeded the configured budget
Solution:
- Push notifications are not always delivered instantly. Users may still generate impressions or clicks after a campaign limit has been reached. For this reason, small budget or traffic overruns may occasionally occur.
Verification
Related
- Traffic volume and bid recommendations
- Micro-bidding Tool
- Automatic Rules for Blacklisting
- Targeting by operating system
- Targeting by traffic quality and category
Campaign delivery time
Summary
Define the days and hours when your push notifications can be delivered.
Before You Begin
- Role: Advertiser
- Estimated time: ~1 minute
Steps
- Locate the Show to User at Time section in the Targeting settings.
- Select the days and hours when notifications should be delivered based on the user's local time zone.

Feature: To select a specific hour across all days, click the hour column header. To select all hours for a specific day, click the day name on the left.
Note: Delivery schedules define when notifications may be sent. Actual delivery depends on the user's device being online and able to receive push notifications.
Troubleshooting
Issue: My push notifications are delivered at the wrong time.
Solution:
- Push notification delivery depends on user availability. If a user's device is offline or disconnected from the network during the scheduled delivery time, the notification may be delivered later when the device reconnects.
Verification
Related
- Campaign Limits and Frequency Capping
- Traffic Volume and Bid Recommendations
- Targeting by Country
- Micro-bidding Tool
Domain Volumes Video
Summary
Use Domain Volumes Video to discover available traffic sources, review estimated traffic volumes, and quickly build a whitelist for your Video campaigns.
Before You Begin
- Role: Advertiser.
- Required information:
- Existing Video campaign
- Whitelist-enabled campaign (optional)
- Estimated time: 2 minutes
Steps
- Open your Video campaign or create a new one.
- Open Domain Volumes Video from the top navigation menu.
- Search for a domain or use the available filters to find the traffic sources you want to target.
- Copy the required Source IDs or SubIDs directly from the search results.

Note: Domain Volumes provide estimated traffic availability. Actual traffic depends on your campaign targeting, bid, budget, and current marketplace demand.
5. Paste the copied values into your campaign whitelist and save the campaign.
Troubleshooting
Issue: The campaign receives little or no traffic after applying a whitelist.
Possible causes
- Selected sources do not match your GEO targeting.
- Device targeting excludes available traffic.
- Your CPM bid is too low.
- Budget limits have been reached.
Solutions
- Verify that your campaign targeting matches the selected sources.
- Increase your bid if necessary.
- Expand GEO or device targeting.
- Check your campaign budget.